Showing posts with label appetizers. Show all posts

Friday, January 28, 2011

Spicy Lemon Garlic Shrimp


I tend to think that shrimp tastes the best when flavored with lemon and garlic, so this dish did not disappoint. As an accompaniment to a steak and lobster New Years Eve dinner, I actually didn't have enough room to eat as much shrimp as I would have liked. No real worries though, the flavor goes a long way in this dish. Even though it's highly unhealthy, my favorite part of this dish was using crusty bread to sop up all the melted butter yumminess hiding under the shrimp!

*Note, I halved the original recipe, making enough for 4 people

Spicy Lemon Garlic Shrimp
Source: The Pioneer Woman

Ingredients

1 pound Raw Shrimp, Deveined, Shells On

1 stick Cold Unsalted Butter Cut Into Pieces

1/2 teaspoon Kosher Salt

2 cloves Garlic, Peeled

1/8 cup Fresh Parsley

1/4 teaspoon Crushed Red Pepper

1/2 of a Lemon, Juiced


Preparation Instructions

Preheat oven to 375 degrees. Rinse frozen shrimp to separate, then arrange in a single layer on a baking sheet.

In the bowl of a food processor, add cold butter, garlic, lemon juice, salt, parsley, and red pepper. Pulse until combined. Sprinkle cold butter crumbles evenly over the shrimp.

Bake until shrimp is opaque and butter is hot and bubbly, roughly 10 minutes.

Serve shrimp and melted butter with hot crusty bread.

Monday, January 24, 2011

Chinese Egg Rolls


 I like to think I have made it through this pregnancy so far without many cravings. However, one thing had been on my mind for weeks.......egg rolls! Since we are trying to cut back on frivolous spending (but really, are pregnancy cravings frivolous?!?) I decided to attempt making my own egg rolls. The actual assembly of the egg rolls was no big deal, but believe it or not this was my first attempt (ever) at frying food! I have a number of recipes saved that keep getting pushed back because they require frying and I have always been intimidated by the idea of frying food. What kind of oil do I use? What do I do with the leftover oil? How can I attempt to eat healthier if I'm frying food?

Well, I tried my hand at frying, and the results were amazing. Granted not healthy, but the perfect item to satisfy the craving and I can now say I accomplished something new in the kitchen.

If you decide to make these, I recommend reading the Egg Roll rules from the original blogger, Steamy Kitchen. This was so helpful to me, and includes step by step pictures. As you can see from my picture compared to her's, I could not find the correct wrappers and just went with the refrigerated wrappers found by the produce, resulting in the big bubbles when fried:/ While I still found them tasty, next time I may try harder to find the recommended wrappers. These are a bit time consuming, but one batch makes enough to freeze so you can have egg rolls at your disposal anytime:)

Chinese Egg Rolls
Source: Steamy Kitchen

Ingredients:

50 Spring/Egg Roll Wrappers (about 2 packages), defrosted unopened at room temperature for 45 minutes or in the refrigerator overnight
Water, for sealing edges
Oil, for frying

FOR THE GROUND PORK
1 pound ground pork
1 tablespoon soy sauce
1 teaspoon cornstarch
1/4 teaspoon sugar
freshly ground black pepper

FOR THE VEGETABLES
2 to 3 cloves garlic, very finely minced
½ head of cabbage (about 11 ounces)
3 carrots, shredded
1 teaspoon grated fresh ginger
10 fresh shiitake mushrooms (or dried black mushrooms soaked overnight), stems discarded
1 tablespoon cooking oil (canola, vegetable, peanut)
1 tablespoon Chinese rice wine
1 tablespoon soy sauce
1/4 teaspoon sugar
1/2 teaspoon salt
1 teaspoon sesame oil
Freshly ground black pepper

Directions:

1. To make the filling, combine the ingredients for the ground pork together. Marinate at least 10 minutes. In the meantime, shred the cabbage and the carrots using your food processor or by hand. Slice the mushrooms into very thin strips (or you could use your food processer and pulse a few times to get a fine dice.)

2. Heat a wok or large saute pan over high heat. Add the cooking oil and swirl to coat. Add the pork and stir-fry until no longer pink, about 2-3 minutes. Turn heat to medium-low, push the meat to one side of the pan. Add the garlic, cabbage, carrots, ginger and the mushrooms and stir-fry for 1 minute, until the vegetables are softened. Add the rice wine, soy sauce, sugar, sesame oil and black pepper. Continue to stir-fry for another minute. Scoop out the filling to a baking sheet and spread out to cool. Prop up one end of the baking sheet so that it tilts, allowing all the moisture to drain to one end. Let cool for 15 minutes.

3. Discard all of the accumulated juices. Use paper towels to blot the filling to rid of extra oil or juice. Now, you're ready to wrap (see photos from Steamy Kitchen for instructions on how to wrap). IMPORTANT: Only use 1 heaping tablespoon of filling for each egg roll, the width of the egg roll should only be 1.25" diameter.

Keep the rolled egg rolls in neat, single layer and covered with a damp paper towel to prevent drying. If you want to stack the egg rolls, make sure you have layer of parchment paper in between the layers to prevent sticking. Keep wrappers also covered with damp paper towel to prevent drying. Refrigerate up to 4 hours until ready to fry or freeze.

4. To fry the egg rolls, fill a wok or pot with 2 inches of high-heat cooking oil. Heat the oil to 350°F (175°C) or until a cube of bread will fry to golden brown within 10 seconds. Gently slide in or lower the egg rolls, frying 4 to 6 at a time, turning occasionally until golden brown about 1½ minutes. Place on wire rack to drain and cool.

NOTE: To fry frozen egg rolls, do not defrost the egg rolls – just add them to the oil frozen, frying 4 to 6 at a time. Add an additional 1½ minutes to the frying time since they are frozen.


Friday, February 19, 2010

Pizza Bites


Judging by the picture above, can you tell these pizza bites were a hit? I forgot to take a picture before people dug in, but you get the picture. A little ball of dough, pepperoni and mozzarella cheese-what's not to love?! This dish is actually easier to prepare than it looks, especially when using already prepared dough. I would like to try my hand at making my own pizza dough, but for now I'm okay with sticking with the convenience of having it done for me.

I recently discovered Trader Joe's fresh pizza dough, which is what I used to make these. I used whole wheat, but they also have white and (I've heard) some kind of herb dough. And better yet, the dough was only about 99 cents!

Next time I make these I will definitely use more pepperoni (only used one slice per dough ball), and maybe a bigger cube of cheese. I was kind of hesitant about how much filling could fit in each dough ball, and as it turns out they fit more than I expected. The hubby enjoyed these, but he thought they had too much dough and not enough filling. These could also be made with a variety of toppings, so experiment with your favorites and if you come up with a good one let me know:)

Pizza Bites
Source: Annie's Eats, inspired by Chaos in the Kitchen

Ingredients:
Homemade, frozen or refridgerated pizza dough (enough for one pizza)
4 oz. mozzarella cheese, cubed (about 20-24 pieces)
Sliced pepperoni

For topping:
Olive oil
Italian seasoning
Grated Parmesan cheese

Directions:
Preheat the oven to 400˚ F. Lightly grease a 9-inch pie plate or cake pan. Divide the pizza dough into 20-24 roughly equal sized pieces. Take one of the dough pieces, top with a cube of cheese and a slice or two of pepperoni. Pull the edges of the dough around the fillings and pinch closed. Place seam-side down in the baking dish. Repeat with the remaining dough pieces.

Lightly brush the tops of the dough balls with olive oil. Sprinkle with Italian seasoning and grated Parmesan cheese. Bake for 20 minutes, or until the tops are golden brown. Serve warm, with dipping sauce as desired.

Wednesday, February 17, 2010

Chicken Enchilada Roll-Ups

Will someone have a party please so I have an excuse to make these again? Or just invite me over and I'll bring you a snack? Normally I'm not a fan of the traditional roll-ups that people make, but these, oh these roll-ups are FANTASTIC! The original recipe was for a dip, with the roll-ups as an alternative way to serve it, and I think the dip would be great as well.

I used jalepeno-cilantro wraps I found in the grocery store, and the green color really complimented the filling. The hubby said these tasted more like salsa than enchiladas, which I could kind of agree with, but I could also really see the filling being used in traditional enchiladas. Either way, this recipe is a winner in my book.

Chicken Enchilada Roll-Ups
Source: Annie's Eats, adapted from Sing for Your Supper, originally from Come On Over Cookbook from Gooseberry Patch

Ingredients:
2 boneless, skinless chicken breasts
1 (8 oz.) pkg. cream cheese, softened
2/3 cup shredded cheese (cheddar, Mexican blend, pepper jack, etc.)
1 clove garlic, minced or pressed
2 tsp. chili powder
½ tsp. cumin
¼ tsp. cayenne pepper
Salt, to taste
Handful of cilantro, chopped
3 green onions, chopped
10 oz. can diced tomatoes with green chiles, drained well
4-6 8-inch tortillas

Directions:
Season the chicken breasts with salt and pepper. Cook in a skillet over medium-high heat until lightly browned and cooked through. Transfer to a plate and let cool. (I baked the chicken rather than using a skillet)

In the meantime, combine all of the remaining ingredients except tortillas in a large mixing bowl. Mix until well blended. Once the chicken is cool, transfer to a cutting board and chop or shred into small pieces. Add the chicken to the filling mixture and stir well to incorporate.

Spread a thin layer of the filling mixture over a tortilla, leaving a small border clear around the edge. Roll the tortilla up tightly into a spiral. Place the rolled up tortilla on a cutting board and use a sharp knife to cut into 1- to 1½-inch thick segments. Transfer to a serving platter and serve chilled or at room temperature.

Wednesday, January 27, 2010

Honey Roasted Peanuts


(picture from The Novice Chef)

I love having quick things to snack on when I get home from work, before bed, pretty much anytime I walk through the kitchen. Honey roasted peanuts have always been a favorite, and after seeing The Novice Chef's post I was hooked. It's nice to know that with less, all identifiable ingredients, you can get honey roasted peanuts that taste better than the stuff from a can.

I've made these twice already, and each time I got impatient or something because my peanuts don't look the picture above. They taste awesome, but they are more like little peanut clumps than individual ones. I don't think I let them cook in the saucepan long enough, but these are just.so.hard.to.resist. Seriously, make them now.

Honey Roasted Peanuts
Source: The Novice Chef, adapted from Natalie's Killer Cuisine orginally from cooks.com

You will need:

2 cups raw peanuts
2 tbs honey
2 tbs water
2 tbs canola oil (you can also substitute Peanut Oil)
1/4 cup sugar
1/2 tsp salt

Preheat oven to 350 degrees.

Place the peanuts on a baking sheet and in a preheated oven for 10 minutes. (If the peanuts are already roasted, skip this step) Set the peanuts aside and let cool. In a medium sized sauce pan add the honey, water and oil. Bring to a boil and add the peanuts. Stir around for a few minutes, until all of the liquid has been absorbed by the nuts. Transfer into a medium bowl and toss with the sugar and salt. Spread back on the baking sheet with wax paper, let cool. Enjoy!

Thursday, January 14, 2010

Caprese Salad


Another contribution to our New Years Even italian dinner, and it could not have been easier. I had two fresh mozzarella balls to use up so I decided this salad would be perfect! I cannot say whether this was good or not as I did not have any, but my critics said it was!

Caprese Salad
Source: Kitchen Escapes original (you can't really mess it up!)

Ingredients:
2 vine-ripe tomatoes, sliced about 1/4 inch thick
2 fresh mozzarella balls (BelGioioso), sliced about 1/4 inch thick
fresh basil
extra virgin olive oil, for drizzling
balsamic vinegar, for drizzling
salt and pepper, to tast

Arrange on a platter, alternating slices of tomato, cheese and basil leaf until platter is full. Drizzle with a little olive oil and balsamic vinegar; sprinkle with salt and pepper to taste. Garnish with basil chiffonade if desired.

Enjoy!

Monday, January 11, 2010

Beer Dip


Yet another snack I made for our football party, and this seemed to be a hit as well! I have to admit that it actually tastes better than I imagined after just reading the ingredients, but again I blame that on my weird aversion to cream cheese.

This dip came together so fast that it could be made in a bind if needed, and it only needs an hour to chill. I used cheese whiz instead of Old English Cheese, mainly because I'm cheap, but either way would be delicious. I also skipped the pecans on top.

Beer Dip

2 8-ounce packages cream cheese, softened
2 5-ounce jars of Old English Cheese (or 10 ounces Cheese Whiz)
1 1-ounce package dry ranch dressing mix
1/2 cup beer (go ahead, you can drink the rest)
1/2 cup toasted pecans, roughly chopped

Pretzels, crackers, or chips for dipping

In your microwave, heat the cream cheese and Old English Cheese for about 40 seconds on high. This will make it easier to blend them together, using a whisk, with the ranch dressing. Add the beer gradually as you whisk the mixture together, until you reach your desired consistency for the dip. You may not use it all. If so, feel free to drink the remaining beer.

Pour into the serving bowl. Sprinkle your toasted pecans evenly over the surface of the dip. Chill for 1 hour or up to 2 days. Serve with pretzels, crackers, or chips!

Sunday, January 10, 2010

Bacon-Wrapped Jalapeno Thingies


Jalapeno's and cream cheese are not really my thing, but I know it is a pairing that many enjoy, and since I aim to please others I knew these would be very popular. And man did these disappear quick! These came together fairly quickly and easily, and can be made ahead of time. I made all mine up the day before, froze them, and put them in the refridgerator the morning of the party and they baked up perfectly.

I halved the original recipe, so I ended up with about 24 poppers. I also found that my bacon was sometimes too small to wrap, so next time I might just cut the slices in half.

Bacon-Wrapped Jalapeno Thingies

Ingredients
20 whole fresh Jalapenos, 2-3 Inches in Size (I used 12)
2 cubes Cream Cheese, softened (I used one, 1/3 less fat)
1 pound Thin(regular) Bacon, Sliced Into Thirds

Preparation Instructions

If you have them, slip on some latex gloves for the pepper prep… Cut jalapenos in half, length-wise. With a spoon, remove the seeds and white membrane (the source of the heat; leave a little if you like things HOT). Smear softened cream cheese into each jalapeno half. Wrap jalapeno with bacon pieces (1/3 slice). Secure by sticking toothpick through the middle. (At this point, you can freeze them, uncooked, in a Ziploc bag for later use).

Bake on a pan with a rack in a 375-degree oven for 20-25 minutes. You don’t want the bacon to shrink so much it starts to the squeeze the jalapeno. If, after 20 minutes, the bacon doesn’t look brown enough, just turn on the broiler for a couple of minutes to finish it off. These are best when the jalapeno still has a bit of bite to it.

Serve immediately, or they’re also great at room temperature.

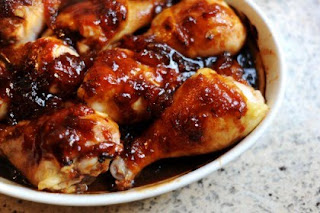
Hot & Sweet Drumsticks


(photo courtesy of Tasty Kitchen)
I recently made these for a Monday night football party we had, and I loved them. I was a little disappointed at the response I received that night, but I blame that on the fact that I did not get them cooked in time, and by the time they were done everyone was full from all the other goodies we had.

I think next time I will try to do a better job at continuing to baste the chicken throught the baking time so they sauce is fully incorporated. These are nice and sweet, with a hint of spice from the hot sauce, which could also be increased next time!

Hot & Sweet Drumsticks
Source: Tasty Kitchen

Ingredients

1 Cup Apricot Preserves
1/2 Cup Ketchup
1/4 Cup Soy Sauce
2 teaspoons Minced Garlic
2 teaspoons Hot Pepper Sauce
3 Lbs. Drumsticks (about 12)

Preparation Instructions

Preheat oven to 350*. In a small saucepan, combine preserves, ketchup, soy sauce, garlic and hot pepper sauce. Cook and stir over medium-low heat until preserves are melted.

Arrange drumsticks in a single layer on a 13 x 9″ baking pan. Pour sauce over drumsticks, turning to coat. Bake, uncovered, for 40-45 minutes or until chicken is done, spooning sauce over drumsticks while baking. Serves 6.

Saturday, January 9, 2010

Marinated Mozzarella Cubes


(Photo courtesy of Taste of Home)
Knowing we had to travel over Christmas, I wanted to be able to pack things that would travel quite easily. These cheese cubes were perfect since they were sealed tight in their jars. I ended up making 2 of these jars, and they either 1) were not very good or 2) or it was just a lot of cheese, because the two jars lasted through two Christmas get-togethers and New Years Eve!

I really liked these, but I think the oil may have thrown some people off. I tried to limit the amount of oil that went in the serving dish, and I think some people were just confused about what those white cubes were! I did not add the roasted red peppers (because I forgot to buy them) but I think next time I will add them in. The only other tricky thing about this is that I could not find any single canning/mason jars, so I had to buy a pack of 12.

Marinated Mozzarella Cubes
Source: Taste of Home

Ingredients:

1 pound mozzarella cheese, cut into 1-inch cubes
1 jar (7 ounces) roasted red peppers, drained and cut into bite-size pieces
6 fresh thyme sprigs
2 garlic cloves, minced
1-1/4 cups Crisco® Extra Virgin Olive Oil or Canola Oil
2 tablespoons minced fresh rosemary
2 teaspoons Italian seasoning
1/4 teaspoon crushed red pepper flakes
Bread or crackers

Directions:

In a quart jar with a tight-fitting lid, layer a third of the cheese, peppers, thyme and garlic. Repeat layers twice.

In a small bowl, whisk the oil, rosemary, Italian seasoning and pepper flakes. Pour into jar; seal and turn upside down. Refrigerate overnight, turning several times. Serve with bread or crackers. Yield: 4 cups.

Herbed Cheese and Cracker Bits

I recently re-discovered this recipe while trying to come up with an appetizer to make for Christmas. It has been awhile since I've made these tasty little crackers, and now I remember why: they are SO addicting! There are similar variations of snacks like this (ranch pretzels and oyster crackers) but this particular recipe takes it to a different level with the cheese crackers. Honestly, I could eat the whole container of these in one sitting, so I think I subconsciously forgot about them to try to keep my weight down:) But I can't wait for another excuse to make them, hopefully soon.

Herbed Cheese and Cracker Bits
Source: Paula Deen

Ingredients:

2 (10 1/2-ounce) boxes cheese crackers (recommended: Ritz Cheese Bits, not peanut butter flavor)
1/2 cup vegetable oil
1 (1-ounce) package salad dressing mix (recommended: Hidden Valley Original Ranch)
1 heaping tablespoon dried dill
1 teaspoon garlic powder
1 teaspoon celery salt

Directions:

Place the crackers in a large sealable freezer container. In a bowl, mix the oil, salad dressing mix, dill, garlic powder, and celery salt. Pour this mixture over the crackers, cover the container, and invert it to coat the crackers with seasoning. Refrigerate for at least 24 hours, turning the container every so often to keep the crackers coated. Let the mixture come to room temperature before serving. Store in the covered container in refrigerator.

Tuesday, October 27, 2009

Enchilada Bites

Ah Girl's Night....a great excuse to meet up with old friends, eat junk food and drink too much:) This past weekend I met up with old roommates for a night out, and I knew that dip's are usually the most common appetizer for people to bring, so I wanted something different. I stumbled upon this recipe for Enchilada Bites and immediately knew I had found my party contribution.

I had a lot of trouble making these, and almost gave up before I finished. The original recipe seemed to leave out some helpful hints, or else I was doing something wrong. I also doubled the recipe, leaving some extra filling for delicious and easy enchiladas a couple nights later. Below is my adaptation of the original recipe.


Enchilada bites
Source: Adapted from Home is Where the Holman's Are
Makes 24-36

Ingredients:
8 corn tortillas
2 cups cooked, shredded chicken
2 cans cream of chicken soup (low sodium/healthy request works fine)
1 can (1 cup) enchilada sauce (Old El Paso Hot)
Mexican cheese blend, about 1 cup

Directions:
Preheat oven to 350 degrees.

Combine shredded chicken, soup and enchilada sauce and heat until bubbling. Cut 3" circles out of each tortilla (3 circles per shell), place cut-outs in microwave and heat according to directions on package, about 30 seconds. Once warm and pliable, press each round into well of a mini-muffin tin.
*This is my adaptation of the original recipe, I finally figured out that the only way to get the rounds to fit into the muffin tin without crumbling was to warm them up first.

Spoon mixture evenly into each muffin cup. Top each with shredded cheese. Bake for 15-20 minutes until cheese bubbles and begins to brown. Use a spoon to pop out each bite.

Enjoy.