Friday, January 29, 2010

Buffalo Chicken Meatloaf

Our first meatloaf as husband and wife and we can't go the traditional route! This is one of a few recipe that I have actually seen Andy get excited about. Even before we baked it we had this conversation:
A: Oh man, a meal I can make by myself when you're not home.
S: You don't even know that it will be good yet....
A: I can tell.

Turns out, I wasn't a fan. Actually, I had one bite and wouldn't eat anymore. I don't know why I thought I would like it in the first place, I do not like buffalo sauce. I think Andy was a bit disappointed as well, but that was probably more due to the Vikings loss:(. After bringing leftovers for lunch, he now rates it a 4/5 and will think about making it for himself if needed sometime. If you love buffalo sauce then go ahead and give this a try!

Buffalo Chicken Meatloaf
Source: Erin's Food Files, Adapted from: Biggest Loser Cookbook as seen on Lobster & Fishsticks

Olive oil spray

2/3 cup old fashioned oats
1/2 cup fat free milk
1/3 cup hot sauce, plus more to sprinkle on top
1 lb extra-lean ground chicken breast
1/4 cup finely chopped celery
1/4 cup shredded carrot (I didn't have any on hand, so I just increased the celery & onion to 1/4 cup)
1/4 cup finely chopped sweet onion
2 large egg whites, lightly beaten
1/4 teaspoon salt
1/2 cup crumbled reduced fat blue cheese

Preheat oven to 350F. Lightly mist a 9” x 5” x 3” nonstick loaf pan with olive oil spray.

Combine oats and milk in a medium size mixing bowl. Mix well. Let stand for 3 minutes or until oats are softened. Stir in hot sauce until well mixed. Add chicken, celery, carrots, onion, egg whites, and salt. With fork, mix ingredients well. Add blue cheese and gently mix.

Transfer mixture to pan and spread so that top is flat. Sprinkle on a couple shakes of hot sauce and spread evenly. Bake 35 to 40 mins or until chicken is no longer pink. Cut into 8 slices. Makes 4 servings.

Nutrition Facts: 263 calories per serving, 35g protein, 14g carbohydrates, 6g fat (2g saturated fat), 74mg sodium (Note: 2 slices = 1 serving.)

Wednesday, January 27, 2010

Honey Roasted Peanuts


(picture from The Novice Chef)

I love having quick things to snack on when I get home from work, before bed, pretty much anytime I walk through the kitchen. Honey roasted peanuts have always been a favorite, and after seeing The Novice Chef's post I was hooked. It's nice to know that with less, all identifiable ingredients, you can get honey roasted peanuts that taste better than the stuff from a can.

I've made these twice already, and each time I got impatient or something because my peanuts don't look the picture above. They taste awesome, but they are more like little peanut clumps than individual ones. I don't think I let them cook in the saucepan long enough, but these are just.so.hard.to.resist. Seriously, make them now.

Honey Roasted Peanuts
Source: The Novice Chef, adapted from Natalie's Killer Cuisine orginally from cooks.com

You will need:

2 cups raw peanuts
2 tbs honey
2 tbs water
2 tbs canola oil (you can also substitute Peanut Oil)
1/4 cup sugar
1/2 tsp salt

Preheat oven to 350 degrees.

Place the peanuts on a baking sheet and in a preheated oven for 10 minutes. (If the peanuts are already roasted, skip this step) Set the peanuts aside and let cool. In a medium sized sauce pan add the honey, water and oil. Bring to a boil and add the peanuts. Stir around for a few minutes, until all of the liquid has been absorbed by the nuts. Transfer into a medium bowl and toss with the sugar and salt. Spread back on the baking sheet with wax paper, let cool. Enjoy!

Monday, January 25, 2010

Garlic Parmesan Oven Fries


Always on the quest for new side dishes, I came across these fries and thought it would be a great alternative to the standard mashed potatoes we have around here. Very rarely do we do baked potatoes, and I guess until I get a request for them, I'll stick to mashed, and now these fries.

These oven fries have great flavor and bake up nice and crisp. I didn't buy fresh parsley, but just sprinkled the dried stuff on top and they were still good.


Garlic Parmesan Oven Fries

source: Joelen's Culinary Adventures, adapted from Tyler Florence
serves 3-4

2 large russet potatoes, scrubbed and dried
1/4 cup extra virgin olive oil
3/4 teaspoon kosher salt
1 garlic clove, minced
1/4 cup freshly grated Parmigiano-Reggiano cheese
2 tablespoons chopped fresh flat leaf parsley

Preheat the oven to 425.

Cut the potatoes in half lengthwise. Then cut the halves lengthwise into fourths to make 16 big, fat wedges.

Toss the potatoes with the olive oil, salt and minced garlic in a large bowl. Place the potatoes onto a metal baking sheet, spreading to a single layer.

Roast the potatoes for 30-35 minutes, until the potatoes are cooked through, brown, and crispy. Don't shake or turn the fries around while they're cooking. The longer they sit in contact with the metal baking sheet, the crisper they get.

Toss the fries in a big bowl with the cheese and parsley and serve hot.

Friday, January 22, 2010

Spaghetti Pie


Ever have one of those weeks where nothing goes right, you come home at the end of the day, and the last thing you want to do is make dinner? Well, it's been one of those weeks:/ However, this dish can easily solve that problem, as it is a cinch to whip up and it can be frozen ahead of time, all ready for you at the end of one of those long, draining days. Also, since we only ate 2 pieces, I was able to wrap up each leftover piece to freeze for future lunches and/or dinners!

Instead of baking this in a 9x13 pan, I used a 10 inch springform pan and it worked great! I used a jarred Arriabiata sauce from Trader Joe's and it added a nice kick to the dish. I also used a whole box of spaghetti because really, the box is 13oz, the recipe calls for 10oz, what do I want 3 leftover ounces for? The results were tasty, comforting and filling-all I was asking for tonight:)

The recipe below is freezer friendly, so obviously skip that step and bake it right away if that's your plan!

Spaghetti Pie
Source: Things That Make You Go Mmmmm, adapted from Freezer Friendz

1.5 lb. ground turkey (or beef)
10 oz. spaghetti (cooked al dente)
2 Tbsp. butter
1/2 cup grated Parmesan cheese
2 eggs (well beaten)
2 c. cottage cheese (I use low-fat)
1 24-28 oz. jar of your favorite spaghetti sauce
8 oz. grated mozzarella cheese (needed on serving day)

DIRECTIONS:

1. Spray a 9x13" pan with non-stick spray.

2. Cook spaghetti and drain. To the cooked spaghetti mix in the butter, Parmesan cheese, and eggs and form into a crust that covers the bottom of your 9x13 pan.

3. Spread the cottage cheese over your noodles.

4. Brown the turkey/beef and add to your favorite sauce then spread over the cottage cheese.

5. FREEZE (I covered with aluminum foil, then the pan lid.)

To SERVE:

Bake at 350 for 30 min. Add mozzarella cheese and put back in oven till it melts. Enjoy!

Tuesday, January 19, 2010

Oven Roasted Cauliflower


For someone who has despised cooked vegetables most of her life, I LOVE this cauliflower! Once roasted it gets all nutty and carmelized and is such a great change of pace in terms of side dishes. My picture doesn't do it justice either, so refer to the original please.

Also note that after 30 minutes my cauliflower was starting to almost burn so make sure you pay close attention to it. I also used regular parmesan cheese, and next time will mince the garlic instead of chopping to ensure it doesn't burn.

Oven Roasted Cauliflower

Servings: 6 • Serving Size: 1 cup • Calories: 94 • Points: 2.25 pts
6 cups cauliflower florets (1 large cauliflower) cut small
3 garlic cloves, chopped
1/4 cup olive oil
kosher salt and fresh pepper
juice of 1/4 lemon
1/4 cup Parmigiano Reggiano, freshly grated

Preheat oven to 450°F.
Combine cauliflower, olive oil, lemon juice, garlic, salt and pepper well so all the florets are coated and seasoned. Place in a large shallow roasting pan and place in the center of the oven.

Roast for about 1 hour, turning florets occasionally so they are evenly cooked. Remove from oven and top with Parmigiano Reggiano and additional salt and pepper if needed.

Monday, January 18, 2010

Southeast Asian Fried Rice


I really had my hopes up about this recipe, and I got let down. I saw this in my Cooking Light magazine and it called my name enough that I had to make it right away. However, I apparently cannot cook brown rice without making it a soggy, mushy mess, and I think that really put a damper on the dish. Also, I expected the flavors to be more robust or something, and something was definitely lacking. And holy green onions!

I posted the original recipe, but if I make this again there will be some changes: 1)less green onions 2)learn how to cook brown rice without making it mushy, or use white 3) double the amount of sauce and use more garlic and sambal oelek. I also used 3 boneless, skinless chicken breasts instead of thighs.

Southeast Asian Fried Rice
Source: Cooking Light Jan/Feb 2010
Yield: 4 servings (serving size: 1 1/2 cups rice mixture and 1 lime wedge)

Ingredients:

1 tablespoon brown sugar
1 tablespoon fish sauce
1 tablespoon less-sodium soy sauce
1 tablespoon fresh lime juice
1 teaspoon sambal oelek (ground fresh chile paste), divided
1/4 teaspoon salt, divided
2 large eggs, lightly beaten
1 bunch green onions
2 tablespoons peanut oil, divided
2 1/2 cups cooked and cooled brown rice
1/4 cup vertically sliced shallots
2 (4-ounce) skinless, boneless chicken thighs, cut into 1/2-inch pieces
1 (6-ounce) skinless, boneless chicken breast, cut into 1/2-inch pieces
2 cups broccoli florets
1 cup julienne-cut red bell pepper
1 1/2 teaspoons minced garlic
Cooking spray
2 bacon slices, cooked and crumbled
4 lime wedges

Preparation:

1. Combine first 4 ingredients, 1/2 teaspoon sambal oelek, and 1/8 teaspoon salt in a small bowl, stirring with a whisk. Combine eggs and remaining 1/2 teaspoon sambal oelek in a bowl. Separate green tops from green onions, and diagonally chop; set aside. Cut green onion bottoms into 1-inch pieces; set aside.

2. Heat a large nonstick skillet over medium-high heat. Add 2 teaspoons oil to pan, swirling pan to coat evenly. Add rice; stir-fry 1 1/2 minutes, stirring constantly. Transfer rice mixture to a large bowl. Heat 2 teaspoons oil in pan. Add shallots to pan; stir-fry 30 seconds or until tender. Add chicken; stir-fry 1 1/2 minutes or until lightly browned. Add brown sugar mixture to pan; bring to a boil. Reduce heat, and simmer 1 minute or until liquid thickens slightly, stirring occasionally. Add chicken mixture to rice mixture.

3. Wipe pan clean with a paper towel; return pan to medium-high heat. Add remaining 2 teaspoons oil to pan, swirling to coat. Add broccoli and bell pepper; stir-fry 3 minutes or until vegetables are tender. Add the remaining 1/8 teaspoon salt, green onion bottoms, and garlic; stir-fry 1 minute or until fragrant. Add chicken mixture to pan, cook 2 minutes or until thoroughly heated; return chicken mixture to large bowl.

4. Return pan to medium-high heat. Coat pan with cooking spray. Add egg mixture to pan, swirling to coat pan; cook 30 seconds or just until egg is set. Transfer egg to a cutting board; chop. Stir egg and bacon into rice mixture. Top with green onion tops; garnish with lime wedges.

Nutritional Information

Calories:438
Fat:16.3g (sat 3.7g,mono 6.7g,poly 4.3g)
Protein:31.6g
Carbohydrate:41.3g
Fiber:5.6g
Cholesterol:167mg
Iron:3.3mg
Sodium:786mg
Calcium:98mg

Sunday, January 17, 2010

Broiled Parmesan Tilapia


Tilapia is our go-to item when we get sick of chicken, and I think this recipe will become a regular. This was the second time making this dish, even though the hubby doesn't remember it! The crust on top of the fish is crunchy, with a nice saltiness from the celery salt, and it really hides the sometimes "fishiness" of the tilapia. I put the fillets in the broiler while still frozen, so they took at least 10 minutes to get flaky.

Broiled Parmesan Tilapia
Source: You've Got Supper

INGREDIENTS

• 1 lb tilapia fillet(s) (about 4)
• 1/4 cup(s) parmesan cheese, grated
• 2 tbsp butter, with salt, softened
• 2 tbsp mayonnaise, light
• 1 tbsp lemon juice (fresh)
• 1/4 cup(s) breadcrumbs (panko is great too)
• tsp garlic powder
• 1/4 tsp paprika
• tsp basil
• tsp pepper
• tsp onion powder
• tsp celery salt

DIRECTIONS

1. Preheat broiler. Grease broiling pan (or line with foil and spray with cooking spray).

2. Arrange fillets in a single layer on the pan. In a small bowl, mix together all remaining ingredients and set aside.

3. Broil the fillets a few inches from the heat for 2 to 3 minutes. Flip fish over and broil 2 more minutes.

4. Remove fillets from the oven and spread the cheese mixture on top.

5. Broil 2 more minutes or until the topping is browned and fish flakes easily with a fork.

Saturday, January 16, 2010

Simple, Hearty White Chili


Have any of you ever perused The Pioneer Woman's website? She's pretty awesome. Her entries are witty, cynical at times, good-natured and the kind of thing that make you want to meet her in real life. And her guest 'Lodge,'=AMAZING. Her website is dedicated to her cooking, photography, home, home-schooling etc., so if you have a chance, take a peek into her life!

Anywhoo, this is the first hearty dish I have made of her's, although I have many saved in my google reader to try at some point (#1 on my list, her Cinnamon Rolls). This chili has a good kick and is pretty simple to put together. The only problem I had was that mine stayed pretty soupy, which is probably because I used skim milk instead of whole, which I never have at home and forgot to buy. I did some googling and found that supposedly 1 cup skim milk + 1 tbls. melted butter= 1 cup whole milk, so I attempted this and I don't think it worked. I even added a second cornstarch/water mixture to try to thicken the chili, but that didn't work either. Next time I'll either buy whole milk or cut back on the amount of chicken broth used.

I used a whole cut up fryer chicken, and served this with cornbread. We had monterey jack cheese, salsa, jalapenos and sour cream as a garnish.

Simple, Hearty White Chili
Source: The Pioneer Woman

Ingredients

1 whole Fryer Chicken, Cut Up (or 3 Cups Cooked Chicken)
1 whole Medium Onion, Diced
4 cloves Garlic, Minced
2 whole Cans Green Chilies, Chopped
1 pound Dried Great Northern Beans, Rinsed
8 cups Chicken Broth
1 whole Jalapeno, Sliced
1-½ Tablespoon Ground Cumin
½ teaspoons Paprika
½ teaspoons Cayenne Pepper
Salt To Taste
White Pepper, To Taste
1 cup Whole Milk
2 Tablespoons Masa (corn Flour) OR Cornmeal
Grated Monterey Jack, To Taste
Sour Cream For Garnish
Cilantro For Garnish
Guacamole (optional)
Pico De Gallo (optional)
Corn Tortillas (warmed)


Preparation Instructions

Cover chicken with water and cook for 20 to 30 minutes or until done. Remove meat from bones. Set aside.

In a dutch oven over medium-high heat, saute onions and garlic for 2 minutes. Add chopped green chilies, then rinsed beans. Pour chicken broth into the pan. Add sliced jalapenos. Season with salt, pepper, and cumin. Place lid on pot and reduce heat to low.

Cook for 2 hours or until beans are done. Halfway through the cooking process, add 3 cups of cooked chicken.

When beans are tender, mix milk with masa (or cornmeal) and pour into the chili. Cook for an additional ten minutes to thicken. Check seasoning and adjust, adding cayenne pepper and paprika if desired.

Add some Monterey Jack cheese to the pot and stir to melt.

Serve chili in a bowl. Garnish with cilantro, sour cream, extra cheese—even pico de gallo and guacamole, if you have some on hand. Roll up warm corn tortillas and serve on the side of the bowl.

Friday, January 15, 2010

Cheesy Potatoes

Cheesy potatoes seem to be one of those things where everyone has a different recipe, but they all taste the same. Some use hashbrowns, some cubes; some cheddar cheese, some american etc. To me, this is one of my ultimate comfort foods that I usually only eat at holiday celebrations, but wish I had more often!

This Christmas was the first time that I was asked to make the infamous cheesy potatoes (well, actually just potatoes, but there was really only one option in my mind). I got out the trusty "church cookbook" to peruse the multiple cheesy potato recipes at hand. I could not find anything that truly tickled my fancy, so I mixed and matched a few and came up with my own version.

One thing that I would change next time is adding 2 cans of cream of chicken soup (noted below) because I was being critical of myself and thought they were dry, but all the Nelson's loved them! (not naming any names, but one of them even ate a plate before they were cooked and said they were good!)

Cheesy Potatoes
Source: Kitchen Escapes

Ingredients:
2 lbs frozen hash browns (used 2 bags of simply potatoes hash browns)
8-12 oz. sour cream
1/4-1/2 cup melted butter
2 cans cream of chicken soup (healthy request or low-sodium)
2 cups shredded cheddar cheese
1 3oz. can french fried onions
salt and pepper

Grease crockpot with cooking spray or butter. Combine all ingredients, saving half of the onions, in crockpot and stir to combine. Cover and cook on low 7 hours (give or take a few). Sprinkle remaining onions on top before serving.

Thursday, January 14, 2010

***Help Haiti***


(cnn.com)
Reading and seeing the devastation in Haiti makes you truly appreciate what you have. Knowing that life will never be the same for millions of people is heartbreaking, as well as seeing what a long, hard road is ahead for those involved, and those trying to get in to help.

My only hope is that after the initial rush to respond and rescue and the constant media coverage, that people continue to want to do what they can to help and that the media does not forget about Haiti.

It warms my heart to see people doing what they can, and thus the reason for my post. Two of the fellow blogs that I read are generously offering their own money to lend some relief in anyway they can.

Ree Drummond (The Pioneer Woman) is hosting a 'giveaway' of (2) $500 donations to the winner's charity of choice to aid in Haitian recovery, AS WELL AS donating $0.10 for every comment left on her site. This may not seem like much, but with almost 15,000 comments left in less than a day, it's turning into quite a donation. Leave a comment and add to her donation here.

Alice from SavorySweetLife.com will also be donating $1 for every comment left on her blog, up to $1000. Leave a comment and add to her donation here.

I really encourage you to check out these two blogs, take a minute to leave a comment and be a part of the Haiti relief effort.

Caprese Salad


Another contribution to our New Years Even italian dinner, and it could not have been easier. I had two fresh mozzarella balls to use up so I decided this salad would be perfect! I cannot say whether this was good or not as I did not have any, but my critics said it was!

Caprese Salad
Source: Kitchen Escapes original (you can't really mess it up!)

Ingredients:
2 vine-ripe tomatoes, sliced about 1/4 inch thick
2 fresh mozzarella balls (BelGioioso), sliced about 1/4 inch thick
fresh basil
extra virgin olive oil, for drizzling
balsamic vinegar, for drizzling
salt and pepper, to tast

Arrange on a platter, alternating slices of tomato, cheese and basil leaf until platter is full. Drizzle with a little olive oil and balsamic vinegar; sprinkle with salt and pepper to taste. Garnish with basil chiffonade if desired.

Enjoy!

Stuffed Shells with Arrabbiata Sauce


This picture does not even begin to show how delicious these shells are. I have made stuffed shells before, but nothing that ever tasted this good. We had an italian themed dinner with some friends on New Years Eve, so I decided these shells would be nice because people could portion how many they wanted to have. I ate too many, and then more after the bar, and then some more for breakfast:/ I just could.not.resist.

I used jarred marinara sauce, but one of my next adventures is going to be making Giada's marinara sauce, so next time these will be made with her recipe, which I've heard is very good. This recipe can also be easily frozen into separate portions, as it makes a lot of food.

Stuffed Shells with Arrabbiata Sauce

Ingredients

12 ounces (1 box) jumbo pasta shells (approximately 36 shells)
2 tablespoons olive oil, plus extra for greasing baking sheet
6 ounces thinly sliced pancetta, diced
2 teaspoons dried crushed red pepper flakes
2 garlic cloves, minced
5 cups marinara sauce
2 (15-ounce) containers whole milk ricotta cheese
1 1/3 cups grated Parmesan
4 large egg yolks
3 tablespoons chopped fresh Italian parsley leaves
3 tablespoon chopped fresh basil leaves
1 teaspoon chopped fresh mint leaves
1 1/2 teaspoons salt
1/2 teaspoon freshly ground black pepper
1 cup shredded mozzarella cheese

Directions

Lightly oil a 12 by 9 by 2-inch baking dish and set aside. Lightly oil the baking sheet and set aside.

Partially cook the pasta shells in a large pot of boiling salted water until slightly tender but still quite firm to the bite, about 4 to 6 minutes. You will continue cooking the shells in the oven after they have been stuffed. Using a slotted spoon, drain pasta shells and place on oiled baking sheet, spreading them out so that they don't stick together and allow to cool.

Heat the oil in a heavy medium saucepan over medium heat. Add the pancetta and saute until golden brown, about 5 minutes. Add the red pepper flakes. Add the garlic and saute until tender, about 1 minute. Add the marinara sauce. Bring the sauce to a simmer, stirring often.

In a medium bowl, stir the ricotta, Parmesan, egg yolks, basil, parsley, mint, salt, and pepper. Set aside.

Preheat the oven to 350 degrees F.

Spoon 1 1/4 cups of the sauce over the prepared baking dish. Fill the cooked shells with the cheese mixture, about 2 tablespoons per shell. Arrange the shells in the prepared dish. Spoon the remaining sauce over the shells, then sprinkle with the mozzarella.

**At this point you can freeze the shells; thaw in the refridgerator or increase the baking time**

Bake in the lower third of your oven until the filling is heated through and the top is golden brown, about 25 to 30 minutes.


Wednesday, January 13, 2010

Cheddar-Bacon-Ranch Chicken & Rice Bake


(photo courtesy of Vintage Victuals)

I don't really like to use someone else's picture, but the only picture I could get of this dinner looked like dog food! And since it actually tasted pretty good, I did not want to frighten anyone away by my lack of photography skills.

This dinner was so easy to whip up and I really liked the infusion of flavor the peppers gave to the rice. However, I am not sure if it was the rice I used or what, but this took closer to 1 1/2 hours to bake before the rice was tender, so I ended up having to take the chicken out and continue to bake the rice mixture in order for the chicken to not get overcooked. Not a huge issue because you can throw it together so quickly, but just something to note in case dinner needs to be done by a certain time. I used brown rice(not instant) and instead of bacon we just sprinkled some bacon bits on top, but I am positive real bacon would have been much better!
Cheddar-Bacon-Ranch Chicken & Rice Bake


1 1/2 cups uncooked rice (white or brown)
1 10.5-ounce can of condensed cream of chicken soup
1 can of water
1 can of milk
1 1-ounce packet of ranch seasoning mix
1 medium green bell pepper, diced
1 medium red bell pepper, diced
4 medium-sized chicken breasts
2 cups cheddar cheese
6-8 slices of bacon, cut into 1″ pieces

Preheat your oven to 350 degrees.

In a 9×13 inch baking dish, combine the rice, the soup, the water, the milk, the ranch seasoning, and the diced peppers. Stir until well combined. Place the chicken breasts on top of the rice mixture. Cover the dish with tin foil and wrap tightly.

Bake for 45 minutes. In the meantime, lightly brown the bacon pieces over medium heat in a small frying pan. When you remove the chicken and rice from the oven, check the chicken to make sure it is cooked through (I like to use a meat thermometer for this). Then, sprinkle with the shredded cheese and the browned bacon pieces. Return to the oven for about 5-7 minutes so that the cheese melts and bubbles. Serve hot. Yield 4-6 servings

Tuesday, January 12, 2010

Cinnamon Rolls


Since this was our first Christmas together as a married couple, and knowing that kids will hopefully be in our future soon, I wanted to start a "family ritual" of some sort. Of course, the hubby found this a bit weird, but I was excited about it. I decided that having homemade cinnamon rolls would be a perfect and delicious ritual to start.

Knowing that at some point every Christmas we will be traveling, cinnamon rolls seemed like something that could be adapted to our schedule. This year, we enjoyed them Christmas Eve morning before we exchanged our gifts, and the dog even jumped up to the counter and found one to steal, they were that good!

These do take a bit of time, but they can be started the night before you bake them and put in the refridgerator overnight. Other than that, this is actually a pretty simple recipe and I think it will be my go-to cinnamon roll for awhile.

Cinnamon Rolls
Source: The Way the Cookie Crumbles, adapted from Cooks Illustrated

Dough:
½ cup milk
7 tablespoons unsalted butter
½ cup warm water (about 110 degrees)
1 envelope (2¼ teaspoons yeast)
¼ cup (1¾ ounce) sugar
1 large egg, plus 2 large egg yolks
1 ½ teaspoons salt
4-4 ½ cups (20 to 21¼ ounces) unbleached all-purpose flour, plus more for dusting the work surface

Filling:
¾ cup packed (5¼ ounces) light brown sugar
2 tablespoons ground cinnamon
1/8 teaspoon salt
1 tablespoon melted butter

Glaze:
1 cup (4 ounces) confectioners sugar, sifted to remove lumps
1 ounce cream cheese, softened
½ teaspoon vanilla extract
1-2 tablespoons milk


1. Heat the milk and butter in a small saucepan or in the microwave until the butter melts. Remove the pan from the heat and set aside until the mixture is lukewarm (about 100 degrees).

2. In the bowl of a standing mixer fitted with the paddle, mix together the water, yeast, sugar, egg, and yolks at low speed until well mixed. Add the salt, warm milk mixture, and 2 cups of the flour and mix at medium speed until thoroughly blended, about 1 minute. Switch to the dough hook, add another 2 cups of the flour, and knead at medium speed (adding up to ¼ cup more flour, 1 tablespoon at a time, if necessary) until the dough is smooth and freely clears the sides of the bowl, about 10 minutes. Shape the dough into a round, place it in a very lightly oiled large bowl, and cover the bowl with plastic wrap. Leave in a warm, draft-free spot until doubled in bulk, 1½ to 2 hours.

3. Mix together the filling ingredients in a small bowl. Grease a 13 by 9-inch baking dish.

4. After the dough has doubled in bulk, press it down and turn it out onto a lightly floured work surface. Using a rolling pin, shape the dough into a 16 by 12-inch rectangle, with a long side facing you. Mix together the filling ingredients in a small bowl and sprinkle the filling evenly over the dough, leaving a ½-inch border at the far edges. Roll the dough, beginning with the long edge closest to you and using both hands to pinch the dough with your fingertips as you roll. Moisten the top border with water and seal the roll. Lightly dust the roll with flour and press on it ends if necessary to make a uniform 16-inch cylinder. Cut the roll in 12 equal pieces and place the rolls cut-side up in the prepared baking dish.*** Cover with plastic wrap and place in a warm, draft-free spot until doubled in bulk, 1½ to 2 hours.

***At this point you can put the rolls in the refridgerator overnight. In the morning, take them out and then them warm/rise on the counter for 1-2 hours***
5. When the rolls are almost fully risen, adjust an oven rack to the middle position and heat the oven to 350 degrees. Bake the rolls until golden brown and an instant-read thermometer inserted into the center of one reads 185 to 188 degrees, 25 to 30 minutes. Cool for 10 minutes. Meanwhile, stir the glaze ingredients together until smooth. Glaze the rolls and serve.

Monday, January 11, 2010

Beer Dip


Yet another snack I made for our football party, and this seemed to be a hit as well! I have to admit that it actually tastes better than I imagined after just reading the ingredients, but again I blame that on my weird aversion to cream cheese.

This dip came together so fast that it could be made in a bind if needed, and it only needs an hour to chill. I used cheese whiz instead of Old English Cheese, mainly because I'm cheap, but either way would be delicious. I also skipped the pecans on top.

Beer Dip

2 8-ounce packages cream cheese, softened
2 5-ounce jars of Old English Cheese (or 10 ounces Cheese Whiz)
1 1-ounce package dry ranch dressing mix
1/2 cup beer (go ahead, you can drink the rest)
1/2 cup toasted pecans, roughly chopped

Pretzels, crackers, or chips for dipping

In your microwave, heat the cream cheese and Old English Cheese for about 40 seconds on high. This will make it easier to blend them together, using a whisk, with the ranch dressing. Add the beer gradually as you whisk the mixture together, until you reach your desired consistency for the dip. You may not use it all. If so, feel free to drink the remaining beer.

Pour into the serving bowl. Sprinkle your toasted pecans evenly over the surface of the dip. Chill for 1 hour or up to 2 days. Serve with pretzels, crackers, or chips!

Sunday, January 10, 2010

Bacon-Wrapped Jalapeno Thingies


Jalapeno's and cream cheese are not really my thing, but I know it is a pairing that many enjoy, and since I aim to please others I knew these would be very popular. And man did these disappear quick! These came together fairly quickly and easily, and can be made ahead of time. I made all mine up the day before, froze them, and put them in the refridgerator the morning of the party and they baked up perfectly.

I halved the original recipe, so I ended up with about 24 poppers. I also found that my bacon was sometimes too small to wrap, so next time I might just cut the slices in half.

Bacon-Wrapped Jalapeno Thingies

Ingredients
20 whole fresh Jalapenos, 2-3 Inches in Size (I used 12)
2 cubes Cream Cheese, softened (I used one, 1/3 less fat)
1 pound Thin(regular) Bacon, Sliced Into Thirds

Preparation Instructions

If you have them, slip on some latex gloves for the pepper prep… Cut jalapenos in half, length-wise. With a spoon, remove the seeds and white membrane (the source of the heat; leave a little if you like things HOT). Smear softened cream cheese into each jalapeno half. Wrap jalapeno with bacon pieces (1/3 slice). Secure by sticking toothpick through the middle. (At this point, you can freeze them, uncooked, in a Ziploc bag for later use).

Bake on a pan with a rack in a 375-degree oven for 20-25 minutes. You don’t want the bacon to shrink so much it starts to the squeeze the jalapeno. If, after 20 minutes, the bacon doesn’t look brown enough, just turn on the broiler for a couple of minutes to finish it off. These are best when the jalapeno still has a bit of bite to it.

Serve immediately, or they’re also great at room temperature.

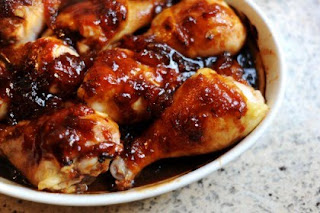
Hot & Sweet Drumsticks


(photo courtesy of Tasty Kitchen)
I recently made these for a Monday night football party we had, and I loved them. I was a little disappointed at the response I received that night, but I blame that on the fact that I did not get them cooked in time, and by the time they were done everyone was full from all the other goodies we had.

I think next time I will try to do a better job at continuing to baste the chicken throught the baking time so they sauce is fully incorporated. These are nice and sweet, with a hint of spice from the hot sauce, which could also be increased next time!

Hot & Sweet Drumsticks
Source: Tasty Kitchen

Ingredients

1 Cup Apricot Preserves
1/2 Cup Ketchup
1/4 Cup Soy Sauce
2 teaspoons Minced Garlic
2 teaspoons Hot Pepper Sauce
3 Lbs. Drumsticks (about 12)

Preparation Instructions

Preheat oven to 350*. In a small saucepan, combine preserves, ketchup, soy sauce, garlic and hot pepper sauce. Cook and stir over medium-low heat until preserves are melted.

Arrange drumsticks in a single layer on a 13 x 9″ baking pan. Pour sauce over drumsticks, turning to coat. Bake, uncovered, for 40-45 minutes or until chicken is done, spooning sauce over drumsticks while baking. Serves 6.

Saturday, January 9, 2010

Marinated Mozzarella Cubes


(Photo courtesy of Taste of Home)
Knowing we had to travel over Christmas, I wanted to be able to pack things that would travel quite easily. These cheese cubes were perfect since they were sealed tight in their jars. I ended up making 2 of these jars, and they either 1) were not very good or 2) or it was just a lot of cheese, because the two jars lasted through two Christmas get-togethers and New Years Eve!

I really liked these, but I think the oil may have thrown some people off. I tried to limit the amount of oil that went in the serving dish, and I think some people were just confused about what those white cubes were! I did not add the roasted red peppers (because I forgot to buy them) but I think next time I will add them in. The only other tricky thing about this is that I could not find any single canning/mason jars, so I had to buy a pack of 12.

Marinated Mozzarella Cubes
Source: Taste of Home

Ingredients:

1 pound mozzarella cheese, cut into 1-inch cubes
1 jar (7 ounces) roasted red peppers, drained and cut into bite-size pieces
6 fresh thyme sprigs
2 garlic cloves, minced
1-1/4 cups Crisco® Extra Virgin Olive Oil or Canola Oil
2 tablespoons minced fresh rosemary
2 teaspoons Italian seasoning
1/4 teaspoon crushed red pepper flakes
Bread or crackers

Directions:

In a quart jar with a tight-fitting lid, layer a third of the cheese, peppers, thyme and garlic. Repeat layers twice.

In a small bowl, whisk the oil, rosemary, Italian seasoning and pepper flakes. Pour into jar; seal and turn upside down. Refrigerate overnight, turning several times. Serve with bread or crackers. Yield: 4 cups.

Sausage and Chicken Jambalaya

I did not get a chance to get a picture of this before it was devoured by our Monday night football guests a few weeks ago. I did not even eat anything other than the random bits left in the crock-pot! That was alright though because my mom has made this before so I knew what I was missing out on.

This recipe was passed on to me by my mom, and I have no idea where her photocopy came from. So just to be clear, this is not my original recipe! But this is really good. I have never had jambalaya before this dish, and I am fairly certain this is not "authentic" jambalaya, but it still tastes great and feeds a hungry crowd, which is all good in my book.

My mom has adapted this to be made in the slow-cooker, and it still tastes just as great! The original recipe says it serves 6, so I doubled it for our party, but the original is below.

Sausage and Chicken Jambalaya
Source: unknown
Serves 6

Ingredients:
1 lb. boneless, skinless chicken breasts, diced
Mrs. Dash or other seasoning for the chicken
2 Tbls. oil
1 medium onion, diced
1 green bell pepper, diced
2 garlic cloves, minced
1 tsp. Thyme
2 Tbls. parsley, chopped
1/4 tsp. cayenne pepper
3/4 lb. smoked sausage, sliced
3/4 cup Acini di Pepe noodles
2 1/2 cups low-sodium chicken broth

Stovetop:
Heat the oil in a large skillet and brown the chicken. Once cooked, remove the chicken and set aside. Add the onion, bell pepper and garlic to the oil and cook until just soft. Add the sausage and herbs; stir for 1 minute. Return the cooked chicken and add chicken broth. Bring to a boil, reduce the heat, cover, and simmer 30-40 minutes. Add Acini di Pepe and continue to simmer until pasta is tender. Serve warm.

Crockpot:
Heat the oil in a large skillet and brown chicken. Once cooked, remove the chicken and set aside. Add the onion, bell pepper and garlic to oil and cook until just soft. Transfer chicken, onion, pepper and garlic to airtight container and keep in refridgerator until ready (can be done the day before). Combine chicken, onion, pepper and garlic in crockpot. Add thyme, parsley, cayenne, sausage and chicken broth. Cook on low for 4 hours. Add Acini di Pepe during last 10-15 minutes. Serve warm.

Herbed Cheese and Cracker Bits

I recently re-discovered this recipe while trying to come up with an appetizer to make for Christmas. It has been awhile since I've made these tasty little crackers, and now I remember why: they are SO addicting! There are similar variations of snacks like this (ranch pretzels and oyster crackers) but this particular recipe takes it to a different level with the cheese crackers. Honestly, I could eat the whole container of these in one sitting, so I think I subconsciously forgot about them to try to keep my weight down:) But I can't wait for another excuse to make them, hopefully soon.

Herbed Cheese and Cracker Bits
Source: Paula Deen

Ingredients:

2 (10 1/2-ounce) boxes cheese crackers (recommended: Ritz Cheese Bits, not peanut butter flavor)
1/2 cup vegetable oil
1 (1-ounce) package salad dressing mix (recommended: Hidden Valley Original Ranch)
1 heaping tablespoon dried dill
1 teaspoon garlic powder
1 teaspoon celery salt

Directions:

Place the crackers in a large sealable freezer container. In a bowl, mix the oil, salad dressing mix, dill, garlic powder, and celery salt. Pour this mixture over the crackers, cover the container, and invert it to coat the crackers with seasoning. Refrigerate for at least 24 hours, turning the container every so often to keep the crackers coated. Let the mixture come to room temperature before serving. Store in the covered container in refrigerator.